
Now we learn how to take off the training wheels and take some control in lighting our photos. We won’t accept what our camera calculates as the “right” exposure and instead, purposely overexpose and underexpose our photos.
Let’s use the exposure value of 0 (i.e. ****) as a starting point to refer to how your camera automatically exposes a scene.
On this scale, each whole number will refer to twice as much light as the previous number.
So what’s EV 1?
Twice as much light as EV 0.
What’s EV -1? EV -2?
Half as much and one-fourth as much light, respectively, as the amount needed for EV 0.
You get the idea.
Here’s a quick photo diagram:
TK
From here on out, I will use terms like EV +1 as short-hand for saying “twice as much light as normal exposure.”
The word stop is also used as a unit of exposure. So, to drill it in your head:
- “Increase the exposure 2 stops” » “Quadruple the amount of light for the photo”
- “Go down a stop” » “Cut the amount of light in half”
How do I adjust exposure on a “real” camera?
Note: Some modern digital cameras have touchscreen displays that emulate the touch-selection feature of cameraphones.
Note #2: If you have a simple point-and-shoot, you may not have to select an actual mode.
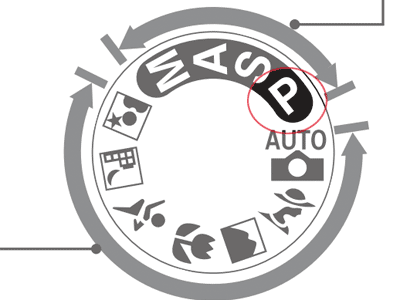
First, you need to be in the proper mode. Most digital cameras have something called Program mode, usually listed as P on a dial or menu setting. This mode gives you direct control of the exposure level.
Here’s the P mode on the Nikon D80 dial:
Now that you’re in the proper mode, you need to find the actual button/dial/control that increases and decreases the exposure. This varies with each camera.
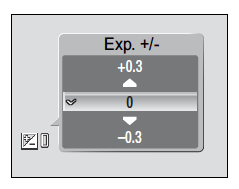
For point-and-shoot cameras: this is usually buried in the camera’s menu system. Look for the +/- menu item. It will look something like this (from the Nikon COOLPIX S200):
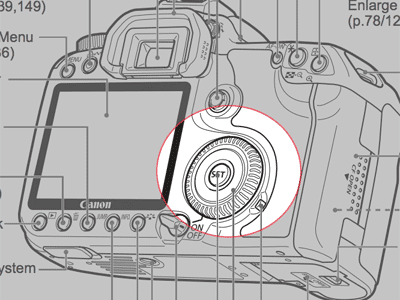
On a DSLR camera: there will usually be a dial or physical button dedicated to EV control. The Canon 40D (and similar bodies) have a configurable main dial on their backs:
I’m in ‘Program’ mode and found the EV dial. Now what?
First, look at whatever your camera has for a “viewfinder”: either an actual viewfinder or an LCD screen on the back.
There should be a line with ticks, starting from -2 to 0 to +2 (remember our discussion about EV and stops?)
IMGTK
Play around with the control. Pushing/spinning it one direction should move the tick mark in one direction or the other.
Let’s test it out:
1. Point your camera at a well-lit daylight scene.
Without doing anything, your camera should calculate an exposure for the scene. Dark areas will be in total shadow. Details in the lightest areas will be “blown out.”
2. Change the exposure setting to +2
The overall scene should darken. Your camera is now exposing for the highlights, letting you see detail in the lightest areas while blacking out the details in the relatively darker areas.
3. Change the exposure setting to -2
The overall scene should lighten. Your camera is now exposing for the shadows, letting you see detail in the darkest areas at the expense of blowing out the detail in all of the relatively lighter areas.
When do I want to manually adjust exposure?
Anytime you want to show something that the automatic setting doesn’t show to your satisfaction.
When would you underexpose a photo?
When the subject is brighter than the background: To see details while darkening the background
When the subject is dimmer than the background: To reduce the subject to a silhouette
In a darkly-lit area: To preserve detail. To make better use of what light there is.
When would you overexpose a photo?
When the subject is brighter than the background: To really ghost out the subject and the entire scene.
When the subject is dimmer than the background: To see details in a dark complexion object.
In a darkly-lit area: You typically won’t want to overexpose a dark scene because it will be difficult for your camera to do so without compromising image quality. Think about it; a dark scene doesn’t have much light. By trying to overexpose, you’re asking your camera to do what it can to suck up what scarce light there is. This either requires a slow shutter speed – resulting in motion blur – or becoming extra-sensitive to light, which adds ugly pixelated noise to the captured image.
There are, of course, times when you want motion-blur, such as a photo of light trails. In that case, you’d better have a tripod.
(image)
What does the camera physically do when I over/underexpose a photo?
If exposure can be changed, what’s keeping me from allowing +10 light
Let’s start off with some vocabulary.
Imagine a line representing the continuum of exposure, from really underexposed to really overexposed.
Imagine that the middle of that line represents well-exposed
Now, to the left of that middle marker we put a tick mark to represent an exposure level that is half the amount of light as well-exposed.
Now add a tick to the right of the well-exposed middle marker is twice the amount of light as well-exposed.
A stop refers to each of these ticks on our imaginary line. Let’s see how this line exists in a typical camera:
A stop of +1 is twice as much light. A stop of +2 is twice +1, so therefore, four times as much as well-exposed.
And of course, an f-stop of -1 is half as much light; -2 is a fourth of the light needed for well-exposed.
How can a camera let in/keep out light?
Without changing the source or quantity of light, you can adjust the amount of light that affects the exposure through shutter speed, aperture, and ISO.
These are covered in their own separate chapters, but let’s use shutter speed as an example. This refers to the how long – in terms of time – that a camera’s shutter allows light in.
A slower shutter speed allows more light.
Here’s a well-exposed scene in which the shutter is open for 1 second:
Keeping all other settings the same, here it is open at 2 seconds that is, twice as slow:
So doubling the shutter speed doubles the amount of light. Or, using f-stop terminology, it is +1.